
.png)
How To See like An Artist: History of Artist tools, Perspective, Creating Good Visuals
- Michelle Rose
- Apr 7, 2021
- 14 min read


Perspective is everything. How we look at what is in front of us and translate that into visual our visual story says a lot about who we are as human beings. I think it's the most natural thing in the world to want to tell those visual activities as accurately as possible.

Keeping Perspective
Before the camera's dawn, there was paper and pencil, and before them, a rock and a charred stick from an extinct fire rubbed against that wall... And in between all of them is our undocumented visual memories. They all pop up and haunt us or drift smiles across our faces without invitation or warning. Like a breezy wind, we don't always know from which it came, but memory has travelled unannounced athwart our brains.

Pietro Perugino, Christ Handing the Keys to St. Peter, 1481-1482.But there are times we try to live intentionally. We want to remember, hand over from antiquity to the future generations. Pictures are like hand made visual notes delivered to our predecessors, stating: "We lived our life".
Taking pictures or making them helps us see who we are, and we were initially maybe only a few years ago. I think it's why scrapbooks, journals and keepsake boxes have never stopped being in fashion.
Alexandros of Antioch's Venus de Milo, pictured below.
People keep things cause they help us say, "We as a human race are real and valued.". It's our human nature showing how we mark time, remember, and even forget until rediscovered ten to ten thousand years later.
A Bit of History
Perspective drawing is actually one of those things only in the last 500-600- years have we re-remembered how to do. There is a time in history that is considered the dark ages.
We often think of these times safely in the future as particularly grim. But that's not entirely correct.
What historians mean by the dark ages is that there is a time in history that is dark as far as researchers are concerned. People did not document, or did document and did not preserve their documentation of how they created things and lived life. We are in the dark about them and what they did, hence the name, dark ages.
Pictured to the bottom right: "Uneasy Easy Clarity". I painted this in 2014. Its probably my favorite work from my first semester in collage.
Historians love to combat each other in commentaries over this period with lots of theories from war, plague, famine, or even a change in human values. The truth is we don't know. But what we do know is that from after the fall and the latter half of Rome's decline, the dark agers started to document, read and research life again. The economy boomed, and with this boom, there was extra money to invest into the writers, painters and sculptors who as a group told the story of their patron's version of history.
The history those patrons created has now become part of our orthodox cannon. It's why it is so important to invest in artists and to try to tell our lives in a way that is correct, aureate and less tainted by the safety of an artists steady paycheck. We as a people can do that by investing in artists who make those efforts to tell our memories as we see them and as they are to the collective of our age in time.
Model below is Victoria Bunyan in "I've Got A Feeling", which was created earlier this semester for my Figure Drawing texture study.
After artists started to find more steady employment, they began to research and learn how to draw and create better works like those made before the fall of the dark period in history. It was to their benefit because when their work followed after the fashion on what we would call realism, they would call the classical style more patronage. With more commerce, they could afford better, more vivid pigments and other artist materials. Not to mention financial security for their children through a thriving business that could and would be passed down from generation to generation.
Pictured below: Draughtsman Making a Perspective Drawing of a Reclining Woman by Albrecht Dürer (German, Nuremberg 1471–1528 Nuremberg)
It became vogue and high fashion to be a learned person. Part of that learning or at least should be within one's home works that displayed a classical understanding of the artistic structure, mass and linear perspective.
Pictured below: The Bedroom Vincent van Gogh (1853 - 1890), Arles, October 1888 oil on canvas, 72.4 cm x 91.3 cm
Over time, artists developed tools to create more realistic perspective drawings or paintings and create them quicker. Because the more art one artist studio produces, the more product choices patrons have to pick from the studio. The more patrons a Master artist would have meant, one could teach more students or hire lesser artists to reproduce their Masterworks repeatedly due to their popularity and sales revenue. Leaving the Master artist free to oversee and produce specially commissioned works.

Below are a few of the tools they created, and they are still in use by artists to this day.
Admittedly, many of these devices are used by novice or student artists. But there are a few pros who will still pull these skills out when needed for composition, scale, production speed, and distortion.
Visualisers/Viewfinders
The first and most accessible tool is called a Visualiser. Now, not to be confused with the Uk equivalent of an overhead projector, also called a visualiser. A visualiser is more or less a small picture frame. They are usually made from paper or cardboard. But some are made from wood or even sometimes pipes.
(Being artists, they are often resourceful and make their tools instead of purchasing them over time. Other materials are usually more critical of financial investment, like pigments and binders, to create their artwork creations.)

Artists use visualiser's in the studio, out in the field or to help clients see what an image could look like in a painting. For the latter two reasons, visualiser's are often small or collapsible so that the artist can bring them with them. I carry mine in my current sketchbook.
Below is a picture of me painting the south west coast of England in 2018. My husband and father-in-law went surfing while I was left to my own devices. The tide slowly but surly creeped in closer to me over the course of a few hours. I stayed in the same spot until the water touched my toes. Then, we set me up in a new spot, and I got to start a new work. It was a lovely day, and I can't wait to get back out there!
Visualisers are handy little tools, and I think they should be in any artists toolbox; just like a picture frame, they help the artist focus on one area. Artists use visualiser's to compose a work because an artist will only paint within the frame's boundaries. It's like painting exclusively what is seen in the window.
Click on my picture, and it will bring you to a site where you can purchase a visualiser

A visualiser is often used to make fun of artists in comedies; usually, an artist will create a rectangle with their hands and look through it and say something like, "Stop right there! Yes! Perfect, just hold that pose. Oh yes! you will do nicely. *Artist snaps fingers and looks at the artists assistant, who is covered in the master artist's tools* "Nigel, break out the Prussian pigments! I feel the vibrations wafting sent of art in the making!" * Artist waves hands and sniffs with pleasure*
Click the picture and get the book
Why Should You Use A Visualiser?
New artists and even the old pros can find drawing or painting everything in front of them distracting, and sometimes this distraction can create works that have a weak composition.
Visualisers' are most usually used by Plein air painters-(Painters who paint outside or on-site.). Because seeing so much scenery can overstimulate the mind, the temptation to "Paint It All!" is a strong one for inexperienced artists.
Visualisers curb this most basic of mistakes and the artists temptation to create unthought out compositions.
In some ways, visualiser's are the predecessors of the reference photo. They are straightforward to make.

How To Make A Visualiser
Measure the paper's size in your sketchbook or the typical length and width of the paper you regularly favor.


The inner side of the visualiser's frame should equal the size of the picture plane. If you want the visualiser smaller than the canvas, then the frame's inner side's ratio should keep in scale with your picture frame. This way, what you see inside the visualiser will always fit your preferred surface for your creative adventures.
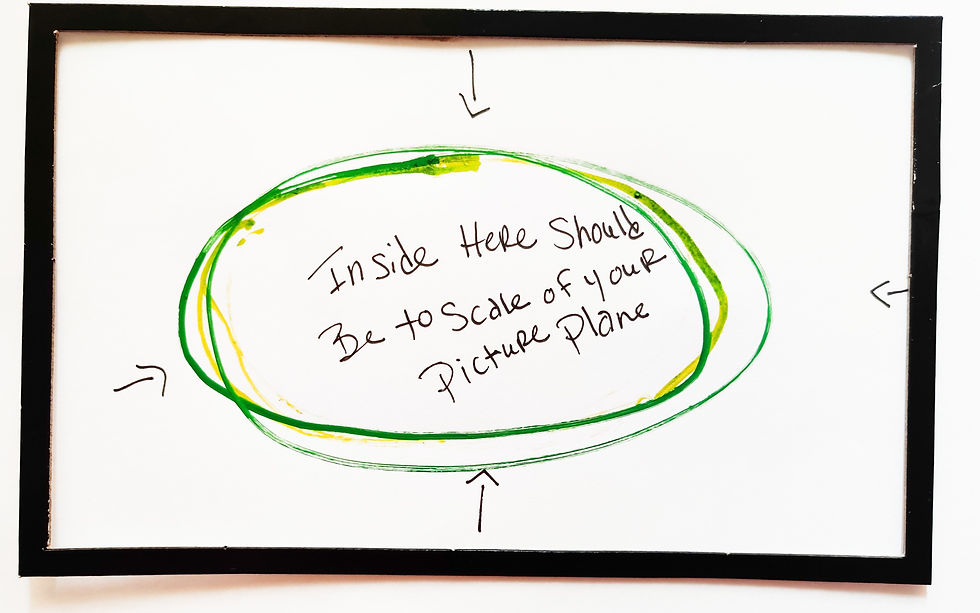
For example, if your sketch pad paper size is 8x10 inches, you could scale down your visualiser's picture plain by half, so your visualiser's inner frame 4x5 inches.
Side Note-Visualiser Advice:
Tip To Find Great Paper Sizes From JCML Fine Art
If you use the "A" sized measured papers, canvases or picture plain surfaces, it is easy to scale down or blow up your works to larger sizes because each "A" sized measurements are almost one and half times as big or small then the next A sized paper. A sized papers fallow the rule of the Golden Mean, which in its self is a great composition tool!
		What Is The Golden Mean and How Do Artists Use It?
		Click the picture below to find out more.

For instance, if you use an A6 paper sketchbook while you are out in the field. Then come home and work on the formal work in a size A2 (Which is significantly larger than an A6); it will still stay within ratio to your original image and scale to your visualiser. This "A" sized system helps you because you will only need the one visualiser. If you have different sized papers or surfaces, you will need to create a visualiser for each surface to ensure proper proportions and influential compositions.

The kind of material you make your visualiser from is up to you; some artists use a sheet of printer paper.
I would recommend that you use a more substantial type of paper, like 300gsm paper or stronger, particularly if you plan to use your visualiser out of the studio. Wind and sturdiness can be significant factors in a pleasant experience and an angry artistic tantrum. Choose wisely.
A Little Bit About Artist Papers
In case you don't know much about artists papers, here is a tip to know how strong your sheets of papers are, and therefore which one to use for your visualiser's Grams per Square Meter- is a standard measurement of papers that test the surface's sturdiness. When testing the paper, they will place weights on the paper, slowly amping up the burden until the paper rips apart.
The GSM is how much stress the paper's surface can take before it breaks.
Sometimes, you will see sheets of paper advertising: 130lb or 130 PSI- Pounds per Square Inch instead of or included with the GSM number. This pound stress test is the same exam, but the measurement is done in pounds instead of grams.
Papers advertised in PSI are usually used in the United States, whereas in Europe, GSM numbers are more popular. Often you will see both numbers depicted on quality artist papers. But if they don't advertise your preferred measurement, the conversion rate is 1.48GSM to 1LB.
The larger the GSM/ poundage of the paper number, the stronger the paper.
Other Options Besides Paper
Other options to make a visualiser from are carboard or leftover cuts of matte board. Just recycle one of your old Amazon boxes, or sometimes even a shoebox works excellent! If you are like me, mid pandemic delivery and package items have become more common in your household. Why not use them to your advantage? Whether you use papers, cardboard, or matte board, the same principles apply when making your visualiser.
If you decide to make your visualiser cardboard or leftover matte board: Make sure the edges are square, at a 90' angle at each of the corners.

If the outer edges are not right-angled, the inner visualiser measurements will also not be square. If that happens, your picture will be distorted. It will not match your pigments surface, meaning your composition will also be weaker because what is in the visualiser can not be placed on your work artistic façade.
Taking time to measure correctly is the foundation to creating a proportionate visualiser.
Back to Instructions:
The visualiser's outer edge should be at least 2-4 inches, or 5-10 centimetres greater than the visualiser inner edge. What I mean is if your internal frame size is 8x10 inches, then your starting piece of paper to create your visualiser be 10"x12"-12"x14" or 10x15-15x20 centimetres.

These extra few inches or centimetres make the whole picture frame, also known as the visualiser. The visualiser's thickness is really up to you and your preferences.

Some like a thick frame because it helps artists ignore better what is outside of the visualiser Others like a thinner one because they feel the larger border is more distracting to their painterly process.
For you, some of this will be trial and error to find a visualiser that fits your artistic style best. A suggestion would be to make the same size picture plain visualisers with thicker and thinner borders. Then, you can find the size that works best for you.
Once you have figured out the size of the border you would like your visualiser, find your surface's central access.

Place a mark on the central access.
Since earlier, you have done the math to find the ratio and scale needed. AND..
For ease of understanding, we will use our 8x10 inch sketchbook example. Remember, we scaled down the size of the visualiser by half the size of the picture frame. So, in this case, our visualiser's inner edge of the picture frame is 4x5.
Knowing this, we will mark 2 inches from the left and from the right of the central access point to get the height of the inner edge of the picture plane of the visualiser.
Repeat the same process for the length of the inner edge of the visualiser. Only this time measure 2.5 inches from the left and the right of the central access point.

Once these marks have been made, you will have the visualiser's picture frame's inner framework. Take a ruler and draw a straight line down each of the four marks made on the surface. Once you are done, you will have a rectangle that will measure 4x5 inches inside the paper. Again, make sure the edges are square, at a 90' angle at each corner. Take the time to be fussy because once you start cutting the inner rectangle away from the visualiser's frame, there is no going back. If this is wrong, you will have to start over.

To cut away the excess unneeded rectangle away from the visualiser's frame, I would recommend using a ruler, self healing cutting board and an Exacto knife. You could do this with scissors, but your acrasy to get a straight line is decreased. Accuracy is what makes a sound visualiser. Taking your time to check and recheck the size is advisable.

When placing down the ruler, do it to cover the picture frame side, not the side of the leftover rectangle. This way, if you make a mistake, you will cut into the excess side, making the work more easily correctable, then having to start from scratch from a slip of the hand in the wrong direction.
Slide the Exacto knife down the ruler's straight edge and along each of the marked lines of the 4x5 rectangle.

Remove the rectangle away from the visualiser, and Tada! You're ready to start making art.

If you want to be fancy, you can make yours out of wood, plumbers piping, really the means and creativity you take to make your visualiser. Vincent Vangoh had his made out of wrought iron. His visualiser to two collapsible polls that he hammered into the ground, instantly marking his spot, which he found most helpful as he often returned to the same site to make his paintings. I would suggest making one out of paper or cardboard first to hang before making another visualiser and also have one made for you if you find a good artisan and a more serious artist. The investment may be worth the cost of having one made for your specific requirements.
Below is my first attempt to make a visualizer based on  Vincent Van-gosh descriptions and letters written to his brother Theo. It's a bit more complex then the one I am showing you how to make, but it's really about finding the style of visualiser that works best for you. I like this style, and I have made better ones since then, but for a first attempt, I am rather happy with how it turned out.

The book mentioned above in this blog post is where I found the description. 
Another idea is to make two of these visualiser's and place the yarn in between them. The thread is positioned to follow the rule of thirds according to the inner visualiser's framed edge. You would do this to grid your picture plane and more easily foresee foreshortening and proportion issues that may arise without their help. Profesonals use the rule of thirds or grided visluizers, Take Albrect Durr. He created lots of these gridded visualiser's and documented their use.

More heavily gridded visualiser's are used and help young artists or novices see things that pros have practiced enough to know instinctually.
Some younger artists, or even some pros, will make a grid on their intended art surface before they go out painting. This grid corresponds precisely to the scale of the one used in the visualiser. This gridding system makes the initial drawing process quicker, so they can spend more time completing an artwork instead of composing it.

Click the picture above to learn how to grid out and draw a picture.
It may escape the non-artist; light changes throughout the day, which we all know. But for plain air painters, they often go to the same spot, at the same time of day, and only have a few fleeting minutes to create their work before the daylight changes too much for them to work on their compositions.
Pictured below is Claude Monet's Cathedral series. He often painted the same places over and over again at different times of the day. Look how different each image is and why it is so important to have the ground work ready to start painting.
So being able to prep, say by creating grid systems and using visualiser's makes the difference between a finished work or having to come out tomorrow or the next day in which the weather conditions are the same as the first time they created the composition. Time wasting is the Plein air painters worst enemy, so anything to stop that is a huge plus in their art and artistic development.
Other Graphing Perspective Aids
Architects Rulers

Have you ever wanted to take a small picture and blow it up to, say, a 6-foot painting from a paper magazine picture size? Try these. They make it easy to grid out an image to the size of a large canvass by the mere fact the available measurements on these rulers are so small. Architects rulers can blow up each grided unit to whatever preferred measured grid size you like.
Camera Obscura
This method of quickly copying the image has been used by some of the more famous master artists such as Caravaggio. Many master artists can draw, sometimes speeding up the drawing process to test out formal compositions.

They are also great teaching tools for novice artists to learn about line quality, control their implements, and formalize their artistic ideas into more solid works.
The camera obscura is the earliest version of the camera we use today in our cellphones. Some artists knock using such devices as the camera obscura, stating that their use is tacky crutches that make stiff, dull artworks.
While it's true no artist should solely rely on such devices, they are helpful tools. Who am I to criticise a device that has been in existence and in the use of artists for at least 500 years?
Click on the picture below if you would like to purchase a modern version of a camera obscura. All the pictures are linked to each item incase you would like to purchase any of them and start experimenting. 
In the same venue are other aids that help with quick coping and are usually used by illustrators, animators and some indoor muralist painters.
All of these are more or less based on the camera obscura.
Light pad

Light pads are used by illustrators and animators to see where their formal image was and where they want the next one to go. Often there is a lot of copying involved, and this can help speed up the process.
Projector

Projectors are great for copying if you don't have an architects ruler. They often help clients see the scale of a larger painting, or mural they may want to commission. They are handy little things if you need to get an images bones in quickly. They are often connected to document cameras, and are used as the more high-tech versions of those over head projectors everyone remembers from our elementary days and learning how to write in cursive.
Document Camera

Don't for get to click on each of the pictures, most of them have links to cool websites and aids for your new artistic journey!
See you on the other side of the canvass.
JCML Fine Art
Citations
“Grid Systems.” PROGRAMMING DESIGN SYSTEMS, printingcode.runemadsen.com/lecture-grid. Accessed 7 Apr. 2021.
Heiligman, Deborah. Vincent and Theo: The Van Gogh Brothers. Reprint, Square Fish, 2019.
Janson, Jonathan. “The History of Perspective.” Essential Vermeer 3.0, www.essentialvermeer.com/technique/perspective/history.html. Accessed 7 Apr. 2021.
Nix, Elizabeth. “What Happened to the Venus de Milo’s Arms?” HISTORY, 1 Sept. 2018, www.history.com/news/what-happened-to-the-venus-de-milos-arms#:%7E:text=One%20of%20the%20most%20famous,to%20the%20Romans%20as%20Venus.
Nolan, Amanda. “Understanding Linear Perspective in Art.” In Good Taste, 14 Aug. 2019, www.invaluable.com/blog/understanding-linear-perspective-in-art.


Comments